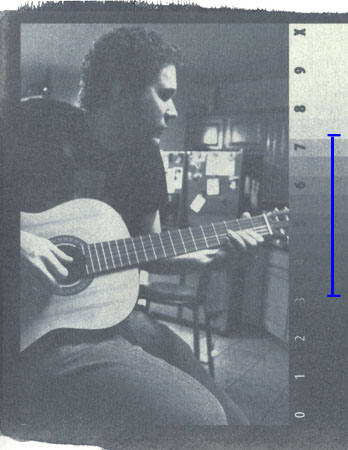
For the first layer I used paynes gray for the pigment, a slightly bluish gray that helps neutralize any yellowish tones left by the dichromate. This was a short exposure, 5 minutes under my uv light unit. As you can see the image looks alright with an equal balance of highlights and shadows, but as we would expect, much of the detail in the highlights and shadows did not print. The blue line points out the part of the scale that printed, centered around middle gray.
Extending the Gum Bichromate Scale
As we have seen in the last section, gum bichromate will print at a higher contrast than your original image losing much of the detail to overexposed shadows or under exposed highlights. One way to combat this is to compress the scale of the inkjet negative. However, this ultra compressed negative scale will cause banding effects and ultimately leaves little room for creativity.
Fortunately, the short scale of gum bichromate can be extended by overprinting distinct layers at different exposure times.
A duotone is a print with 2 layers of 2 tones. In its simplest form these would be two shades of gray. Remember gum bichromate can only render a small portion of a full tonal scale giving us a high contrast print, so let us turn that into an advantage. If we were to underexpose a print, only the darkest tones would print. On the other hand if we were to overexpose a print, only the lighter tones would print. By combining an under exposure with an over exposure, we can end up with a longer scale in our print.

In the image above we start at the top with our original scale of values going from 100% black to 0%. Imagine this is our inkjet negative transparency. If we were to under expose the scale on our first layer of emulsion, only the clearest parts of our transparency would transmit enough uv light and thus only the shadows of our full tonal scale would print. Still we loose 2/3 of the image in the highlights. The blue lines on the 'shadows layer' show an approximation of what an underexposure might print.
On our 'highlights layer', we use an overexposure to print a range of values in the highlights. Everything below middle gray is evenly exposed, in other words no image detail is printed. If we keep this second layer somewhat translucent by using less pigment in the emulsion, the first layer we printed will be visible beneath. Effectively, by over printing two layers we have lengthened the scale which our gum bichromate prints can render!
A duotone example
Above is only an approximation of what happens, so let us take a look at a real example. This is a test image I was using for a while of myself playing a guitar in a friend's kitchen. The inkjet negative was unaltered and includes a scale of values on the right to see how each exposure would print. The exact values of the scale and how to make one will be covered later.


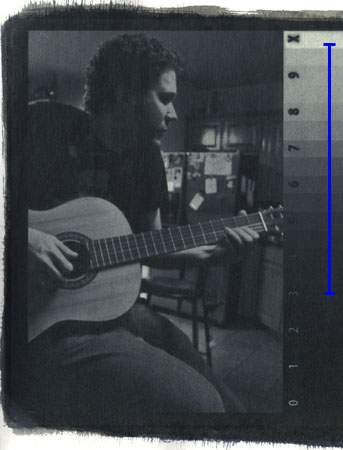
Around a day later, once the first layer was dry, I coated a thinner layer of paynes gray emulsion on top. When this second emulsion was dry I placed the same inkjet transparency over the print careful to align it as close as possible. I find using a little tape at the corners holds the transparency in place quite well. I then gave the print a much longer exposure, around 20 minutes under my uv light unit. The longer exposure printed farther into the highlights and mildly darkened all the shadow tones evenly. As you can see by the blue line, the combination of two layers nearly doubled the span of the gum bichromate scale.
Now unfortunately extending the gum bichromate scale seems to only happen in one direction: into the highlights. That is to say, images will only print darker and darker with every layer you add. Overall this image, even though it has a long scale, has printed far too dark.
How can we make the print lighter and still achieve a full scale? Well, we have to make our inkjet negatives darker! Onward to the next section...
